Intro to Pedals Part 3: Power Supplies

So far we’ve looked at why you might want to alter your sound with pedals, and outlined a sensible approach to discovering which pedals might be relevant to you. I’ve covered how multi effects units aren’t completely useless, but that few people stick with them, they don’t hold any re-sale value, and as such aren’t where you want to spend the bulk of your gear budget.

If you’ve been following so far you’ll probably have a few pedals and have plugged them in and started having fun with them. It’s time to start thinking about power solutions.

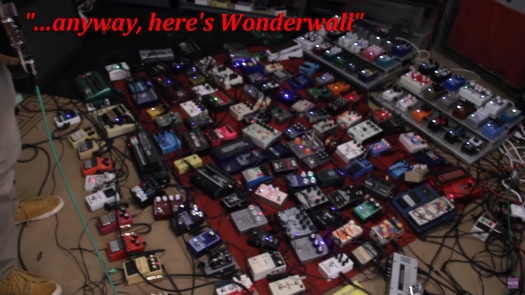
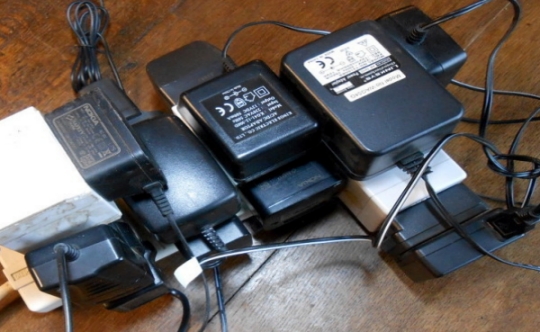
Powering pedals can be fairly impractical. You’ll either go through a lot of 9 volt batteries or have a comical arrangement of wall-wart power adapters. Surely this isn’t what the pros do?

There are of course more practical solutions. Before we get into those, we’ll need to pause for a moment and get a boring but essential bit of science out of the way. When plugging a power lead into a pedal you always need to consider four things:

Voltage, Current, Polarity, and Isolation


Voltage

Most pedals operate at 9 volts, some require more, and some can take more (eg overdrive pedals with different amounts of headroom available). Not providing enough voltage might not damage your pedal, but it will quite likely sound horrible. Providing too much voltage will almost certainly fry your pedal. Before you power up a pedal, be sure of its voltage requirements.


Current

This is a simple concept which confuses many. Current is measured in amps (A) or milliamps (mA), and is a way of measuring how thirsty a device is, not a limit on how much electricity you can throw at it. The mA requirement of your pedal is the minimum it requires to function, and likely how much it will draw from your power supply.

It is perfectly safe to connect a 200mA power supply to a pedal requiring 100mA. The power supply will make 200mA available, but the pedal will only take the 100mA that it needs. If a power supply doesn’t provide enough mA, the pedal won’t function properly or even turn on. Best practice is to have your power supply offer more mA than your pedal requires.


Polarity

Like the tip and the sleeve on your audio cables, power cable connectors have two separate parts to consider. They will either be centre positive or centre negative.

Most pedals will be centre negative, but occasionally (like with some old Proco Rats) you’ll get one that’s centre positive. Be sure of which way around your power lead is, and which way your pedal is designed. If you get this wrong your pedal will either simply not turn on, or end up completely fried. Toss a coin. Whatever the outcome, you’re not going to be using that pedal today.


Isolation

This refers to making sure your pedals don’t share a ground connection.

Pedals often use their ground connection like a sewer line. They dump certain audio frequencies (like the clipped part of your signal in a drive pedal) by sending them to ground. If you hook your pedals up so they share a ground connection (think “pedal sewer line”), these audio artefacts, along with some electricity, could end up being reintroduced to the audio signal of other pedals in your chain. Just like you wouldn’t want your neighbours’ sewerage backing up in your house, your pedals don’t want to be awash with crap from other pedals in the chain.

This could result in anything from a mild, low level hum all the way through to crazy, high-pitched, whistling oscillation noises which can be tricky to troubleshoot.

For example, some folks will complain that a delay pedal at the end of their chain is making a weird noise, when in fact a fuzz pedal at the start of the chain is generating it. It might just be that only the delay pedal is picking it up and making it audible. The solution is not to remove the fuzz or the delay, but to make sure they’re not sharing a ground connection.

So What Should I use?

Daisy Chains

The first thing most rookies try, no doubt because of the low cost and simplicity of it all, is to daisy chain your pedals. This involves one power adapter which plugs into a series of connected cables. This might work for some pedals some of the time, but is generally considered a horrible idea.

All of your pedals are drawing their power from the one source, potentially under-powering them, leading to them not functioning correctly and not sounding quite right. The more noticeable problem though is that they all share an earth connection which could lead to audio interference between pedals (see isolation section above).

If you insist on doing this, you can get away with it under some circumstances. I’d maybe consider it if you have a simple pedal board with only a tuner and a drive pedal or two.

Mixing digital and analogue pedals seems to be the main issue. I believe analogue pedals tend to generate most of the noise in a shared ground connection, while digital pedals pick it up and make it audible. While we’re at it, digital pedals should probably be isolated from each other too. When it comes to power, they just don’t play well with others.

Of course, make sure the adaptor at the start of your daisy chain is providing the correct voltage and enough current for all of your pedals. You’ll typically want a 9v adaptor with a crazy high current. Add together the mA draw of all the pedals you’re going to daisy chain, and make sure the power supply can offer at least that much, preferably more.

1 Spot are the kings of daisy chain solutions, while most other budget pedal brands like Mosky, Donner, and Joyo tend to have something on offer.


Power Bricks

You can buy a power “brick” which takes up only one wall socket space, will convert your AC mains power into DC power at the correct voltage for your pedals, and will have multiple outlets for your pedals to plug into.

They vary massively in price, so let’s have a quick look at what you’re paying for and which features might be important to you.

Some bricks provide surge protection, and most should provide clean, regulated power to your pedals.

The main thing which separates the cheap power supplies from the expensive ones is isolation. The whole point of getting one of these is to provide isolated power to your pedals, so it makes no sense to get one which doesn’t. There are inexpensive ones which are nothing more than a tidier version of a daisy chain solution, offering no isolation whatsoever.

Maddeningly, some claim to be “isolated” while not actually being isolated in the sense we’re thinking of. The power supply itself is isolated from other devices, sure, but we want each of its outputs to be isolated from each other. Look for the words “isolated outputs” or something like that. Don’t be content with merely seeing the word “isolated” in the product description.

The number of outputs will have an impact on the price. Get one with more outputs than you think you need. I don’t care if you think you have all the pedals you’ll ever need to power up, I know you’re lying to yourself even if you don’t. If you get a five outlet power supply, don’t come crying to me when pedal number six shows up and you have nowhere to plug it in.

However much you save by getting the smaller power supply, think of how much more expensive it will be when you have to buy a second one. It will happen. You’ve been warned.

Some will come with a few outputs which are a higher voltage. This can be handy if you have pedals which require more than 9 volts, or it could be a waste of an output if you don’t. Some of these will be switchable between 9 volts and 12 or 18 volts, which is the best option. Just make sure you’re not paying for a power supply with outputs you can’t use.

Just like with the daisy chain solution, you’ll need to figure out how much current you need. Add up the mA of all of your pedals, and make sure the power supply you get can deliver equal to or greater than that amount. There’s no point getting a power supply with over 20 outputs if it only has enough mA to drive one pedal.

Also consider the size of the power supply. If you intend on sticking it underneath a pedal board, you need to make sure it will fit.

It used to be the case that no modest budget power bricks were isolated, and if they said they were, it was mere marketing trickery. That’s not the case as much these days. Check the specs and read reviews. You’ll find many units where someone has bought one and tested the outputs with a multimeter to confirm if they are indeed isolated.

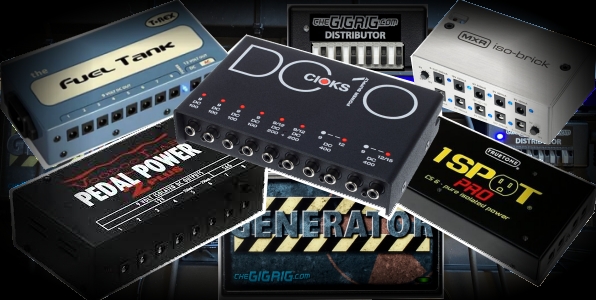
At the budget end of the spectrum, have a look at Caline and Mosky. At the more mid-priced to professional end have a look at:

Probably one of the most expensive yet best value power supplies on the market is from GigRig. They provide a modular solution, meaning when you run out of outputs, you’re not stuck having to buy a whole new power supply. You can simply buy another adaptor with more outputs and plug it into an output of the unit you already have.

To kick start the whole thing, you buy their “Generator”. This provides clean, regulated, surge protected power at a whopping 5 Amps. From there you plug in a “distributer” which gives you 4 outputs. Into each one of those outputs you can plug in an “Isolator” which each provide 4 isolated outputs. This results in 16 isolated outputs. If pedal number 17 ever turns up you can get another isolator and plug it into one of the outputs of one of your other isolators.

GigRig pride themselves on being the best in the business when it comes to durability, quality control, aftermarket support, and most importantly making sure your guitar tone remains pure and untainted. For the record, I don’t have an affiliate marketing arrangement with the GigRig. It’s common knowledge in the industry that GigRig is the Rolls Royce of pedal power supplies.


Next time we’ll look at pedal boards themselves, patch cables, and a few things to look out for when putting it all together.

Intro to Pedals Part 2: Choosing Pedals

So you’ve decided that you want more from your guitar sound than what you get when you plug straight into your amp. It’s time to get a pedal or two, but which ones should you be checking out to begin with?

Multi Effects Units

A fairly common way to get an idea of what’s what, is to get hold of a multi effects unit which supposedly has everything in it. It’s significantly cheaper than buying one of every kind of pedal in existence, and side steps having to deal with mounting them to a board, hooking up lots of patch cables and worrying about power requirements.

If you have access to one of these, maybe on loan from someone else or acquired second hand for some freakishly negligible cost, it might be helpful to play with. You can scroll through all the effects while making an awful racket and taking note of which ones you find interesting.

I’ll stop short of recommending you spend significant money on one of these units, or spend a significant amount of time trying to sculpt a usable combination of sounds with one. I would strongly discourage buying a new one at full retail price.

What will inevitably happen is, over time you’ll discover at least 60% of the sounds in that unit are of no interest to you, and those that are happen to be important enough to you that you want a decent quality version of that effect in an individual pedal. I can’t think of a single guitar player who started out with a multi effects unit and went on to use it exclusively throughout their professional career.

Resale value on these things can be punishingly low, so selling it on once you’re done with it seems hardly worth it. This is not where you want to invest the bulk of your gear budget.

Having said all that, many professional musicians do occasionally gig with top quality modelling gear when they’re travelling light or they don’t want to take their expensive vintage equipment to a particular gig. Worthy of note among these are the Line 6 Helix range, and Neural DSP Quad Cortex.

Those aren’t cheap though, and for the same or less money you could buy one of the actual amps or some of the effects that they’re trying to sound like. Why not have the real thing? When you buy modelling equipment you’re paying for access to a vast range of sounds, most of which you’ll never use.

This brings us to the most important question you need to keep in mind when shopping for pedals: “What are the effects I need in order to generate the guitar sounds I want to play?”

Knowing What to Use

Put together a playlist of the kind of music that you’re likely to play on guitar. Listen to what effects the guitarists in those recordings are using. This will be your starting point. I’m going to make a few suggestions here but you don’t necessarily need these pedals to play that music.

Get a Tuner

OK forget what I just said about not needing the pedals I suggest here. Every guitarist needs a tuner, and that means you, too. Pedal tuners are about the most practical on the market. When you consider the alternatives are either rack mounted, headstock/clip on tuners, or a pitch pipe, this just makes sense.

Important things to look for in a tuner are:

  • Accuracy
  • Tracking speed (when you pluck a note, you don’t want to have to wait for the tuner to “find” it)
  • Visibility in different lighting situations (consider dark/low light in a club versus bright sunlight at an outdoor gig)

The TC Electronic Polytune is hugely popular, and for what it’s worth I’m a big fan of the Korg Pitchblack Custom. While the visibility isn’t quite as impressive as the Custom version, the standard Korg Pitchblack performs much the same and costs a fair bit less.

You don’t have to spend a fortune on a multitude of features here, but you only want to have to make this purchase once and be done with it. This isn’t a fun or exciting pedal, and if you cheap out on something that’s a massive compromise, you might find yourself going through the banality of shopping for another one in the not-too-distant future. There’s no such thing as a “beginners tuner” so you might as well make the investment in a proper one straight away.

Your Average Rock Band

Straight away you’re going to need some sort of overdrive, and it’s quite likely you’ll only need one. If you’re going to play the odd lead break, you may want to also invest in a lead boost. That would sort most rock guitarists out, and this is reflected in the amount of “dual overdrives” on the market (essentially an overdrive with a second switch to engage a boost).

It’s not all that uncommon to want to make use of several different gain stages:

  • a light, just-past-edge-of-break-up overdrive
  • a more aggressive, higher gain overdrive
  • a lead boost

Stacking all of those into each other could also approximate a decent full-fat distortion in a pinch.

Your Average Covers Band

Covers bands play a bit of everything, so surely you’re going to have to get the lot, right? Not necessarily.

Assuming your amp already has reverb, you’ll be surprised just how far you can get with a range of different gain stages (see above) and a delay pedal.

Depending on the material you’ll be covering, you may want to get some sort of modulation. Most commonly this will be chorus and tremolo, but occasionally you may need a flanger/phaser/vibrato etc.

If you’re doing 60s rock covers, you’ll want to get a wah pedal, a fuzz, and maybe a uni-vibe.

The Heavy Stuff

If you’re playing heavy music, some kind of distortion is a must. A lot of metal guitarists will achieve this via an amp with a high gain channel. If you take this route, it’s still worth looking at some kind of lead boost. Consider how loud it is when the rest of the band is pummelling out a down-tuned heavy riff at full volume. Your tiny little single note lines don’t stand a chance of being heard in that mix without some kind of assistance.

Stepping on a Tube Screamer or some kind of Tube Screamer derivative at this point would help a great deal. It would tighten up your bottom end, increase your mids, and in doing so raise your most audible frequencies so the audience can hear you. If you crank the level knob you’ll also enjoy a cheeky increase in overall volume. Most lead boosts will operate like this: they’ll likely lift your upper mids and increase your volume.

If you don’t have a high gain amp, you’re going to need a distortion pedal. There are so many types of distortion pedal on the market I could dedicate an entire series of posts just on this topic. I’ll try to give you a quick over view to get you started on your search.

The good old fashioned Boss DS-1 was a go-to pedal in the 80s but is a bit too shrill and spikey sounding for some rigs. Dialling the tone knob all the way back on one of these might get you the exact sound you’re after without spending a whole lot. A Rat might be worth a look if you want something old school but a bit darker and thicker sounding. They’re kind of a cross between a DS-1 and a Fuzz Face.

If sludgy, doomy, fuzz-meets-distortion is what you’re after, check out the world of Big Muffs. There’s a lot of variation between the different Muffs available, so do your research and try a few out.

If you’re chasing a more modern, djenty sound, there’s quite a lot of options. Check out Deizel pedals for starters. This company is renowned for making epic sounding high gain amps, and they’ve done a decent job of capturing that distortion sound in their pedals.

James Brown (no, not that one, the guy responsible for the design of the Peavey 5150) now has a pedal company by the name of Amptweaker. His distortion pedals are next-level awesome. The MXR 5150 overdrive pedal is geared towards the distortion sound of that amp, and like the Amptweaker stuff, comes with a built in noise gate.

Music hasn’t sounded quite the same since either of these two guys came along.

If you’re looking to spend a little less, there’s the Hotone Djent. It looks like a toy but sounds like the business.

Conclusion

These are all just broad suggestions on where to start if you’re not sure. Whatever you run with for your first pedals, get cheap ones to start with.

Yes, I would discourage spending good money on a multi effects unit to try it all out, on the basis that you’ll probably move on from it and not get your money back. I will however encourage you to take a similar approach with a handful of cheap pedals instead. You might experience a few less effects, but you lose less money and focus on the more relevant pedals to your playing style.

While you figure out what flavour of overdrive or fuzz or distortion etc you’re into, you’re going to swap out and trade your way through a whole bunch of pedals. Better to do that with cheap ones first of all. Even if you start with expensive pedals, you can still be almost certain you’ll end up moving them on at a loss once you refine your tonal tastes.

Here’s how I’d recommend the commencement of your pedal journey:

  • Listen closely to recordings of the genre of music you’d like to play
  • Take note of the effects involved
  • Buy some cheap versions of those effects
  • Once you know what sort of sounds you like, have a look at which pedals on the market do a top notch version of that sound within your budget

Just a word of warning: once you start experimenting with pedals, it’s a slippery slope towards full blown pedal addiction. You’ll quickly find all sorts of pathetic excuses to spend more than you should on just one more pedal. Always keep in mind what you’re trying to achieve with your tone before you browse for pedals, and likewise keep a close eye on your budget. You have been warned.

Once you’ve got a handful of pedals you’ll be wanting to hook them all up in a practical and portable manner. In my next post I’ll be exploring all the non-pedal parts of your floor based gear: pedal boards, patch leads, power requirements, and other stuff you could potentially lose a heap of money on through buying the wrong gear or cutting costs in the wrong area. This post will cover all the hidden expenses we forget about while lusting after the gear that makes cool sounds.