Beginners Guide to Using a Guitar Amp

Remember at school when you were shown how the various knobs and features of a guitar amp work? Me neither. You don’t want to be figuring this out on the fly when you turn up to your first jam, or when you’re trying out an amp in front of a pushy salesman. With that in mind, let’s have a bit of a tour around your average amp.

The Big Picture

Your guitar sound enters the amp at the input, gets shaped in the pre amp, and travels through any effects you may have in the effects loop. The power amp then takes that sound, makes it bigger and sends it to the speaker.

Sounds simple enough, but let’s take a look at how you can tweak that sound in each section of the amp.

Power on & Standby

It’s probably good practice to roll your volume down before turning your amp off, and make sure it’s still down before you turn it back on. I’m no amp tech, but the pop you get when you throw the power switch with the volume still up does not sound healthy for the amp. If nothing else, it’s a courtesy for everyone else in the room. Let’s face it, on a decent sized valve amp, that “pop” is more of a heart stopping “boom”.

As for standby, it’s largely debated as to whether there’s any point in using this feature. Most folks who know a thing or two about amps will tell you that this switch continues to be installed on amps as little more than a superstitious tradition. Having said that, if your manual tells you to leave your amp on stand by for a bit before using it, I don’t want to be the one to void your warranty.

Pre Amp

Inputs

If your amp has multiple inputs, you might be wondering which one you should be using, and why you need choices when it comes to simply plugging in.

On Fender amps with two inputs, one of these will be for pickups with a low output and the other for higher output pickups like humbuckers. When you see four inputs on a Marshall amp, these will be a high and low sensitivity input for each of its two channels.

Bright Switch

Some guitars’ pickups are darker sounding than others. To accommodate for this, some amps will have a bright switch near the input socket which will kick in a little more treble.

Gain

The gain knob controls the signal strength coming into the amp. While originally it may have been intended as another consideration to adjust for pickups with different output levels, the far more popular use of this knob is to turn it up until the signal clips with overdrive.

EQ

The eq section lets you adjust the tonal characteristics of your sound by tweaking certain frequencies or certain ranges of frequencies.

If you want to sound impressive playing on your own, use lots of bottom end while dropping your mid-range for clarity. If you want to be heard at all in a band setting, you’ll want to do the exact opposite. Check out this article about working with overdrive to learn more about setting eq and gain for audibility in a band setting.

Tweaking your low, middle, and high frequencies is a straight forward affair while you have three knobs which correspond with them. What happens when you only have low and high knobs?

It’s simple enough once you get used to an eq like this, but it can be a real hurdle for newcomers. Both of these knobs affect themselves and the mid-range at the same time. Here are a few examples of how they do this:

  • Low and high at halfway: mids are also at half way
  • Low and high cranked: mids are scooped (turned down)
  • Low and high turned down: mids are turned up

Multi-Channel Amps

On amps with more than one channel it’s not uncommon to find a row of gain and EQ knobs for each channel. It’s often the case that each separate channel is a separate pre amp circuit; although in some amps the second channel is actually just a higher gain setting with maybe a bit more treble. If that’s the case you probably won’t have much to tweak the second channel with.

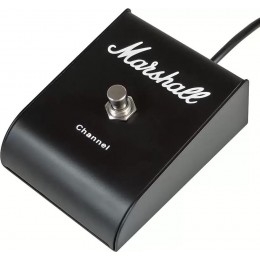
There’s usually a footswitch you can connect to select which channel you want, but you might also find a switch on the amp that does the same thing.

Effects Loop

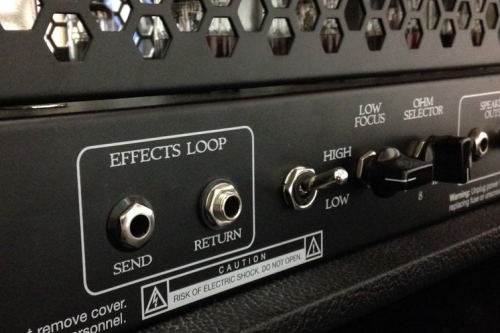
If your amp has an effects loop it’ll typically be on the back panel. To learn more about why you might want to use an effects loop, check out this article on pedal signal chain. Using the loop isn’t all that complicated. You plug a lead in from the “send” on your amp into the input of your pedal. The lead from the output of your pedal goes into the “return” of the loop on your amp.

Power amp

Master Volume

This one is pretty straight forward: it dictates how loud the power amp makes the signal before handing it to the speaker. I should clarify what’s happening here though.

Your power amp is actually always fully cranked, amplifying anything it’s given as much as it can. Much like how the gain knob controls how much signal comes into the pre amp, the master volume knob controls how much signal gets passed from the pre amp onto the power amp.

Presence

When you turn down the Master Volume, you might lose some of the high end from your tone. The Presence control is like a treble control for your power amp, allowing you to recover any lost top end once you turn the volume down.

Speaker Out

This is where you plug a lead from your amp to your speaker. It’s critical you don’t get this bit wrong. First of all, despite looking pretty much the same, instrument cables and speaker cables are different. Even though they both fit into these sockets, it’s important you only use speaker cables for this job, as using an instrument cable here could do damage. Plugging a speaker cable into your guitar would make it vulnerable to interference and noise.

The other thing to look out for here is making sure the amp impedance and speaker impedance match. I could (and probably should) write a whole post about speaker impedances and how to calculate the ohms for different combinations of speakers. For now though, just know that this requires caution. Don’t feel silly consulting your amp’s manual or asking for help from someone who knows about it.

One more caution about this part of the amp: if your amp is a valve amp, never turn it on without a speaker connected.

Dialling it all in

Quiet practice at home

Get the volume to a level you can work with, and then adjust the gain and eq to compensate for the overall reduction in sound. This is where the presence knob will come in handy.

With the volume knob on your guitar set to about half way, turn the gain on your amp up until it starts to break up, and then back it off a tiny bit. This will give you as much sustain and harmonic content as you can get while still having a clean tone. From there you can either use pedals for your drive sounds, use another channel in your amp, or simply roll your guitar’s volume up and hit the strings harder to push the amp into overdrive.

In a band setting

While the band is making a lot of noise, set your volume so you can hear yourself clearly. You won’t win a prize for being the loudest person in the room, and it’s pointless not having it loud enough for you and the rest of the band to hear.

Now adjust your gain as outlined above and set your eq to taste. It’s important to do all this while the band is playing at performance volume, as your audible frequencies are different in a band mix.

If you have the luxury of being able to play fairly loud, try this: Once you’ve got your clean sound dialled in with the pre amp gain at edge-of-break-up, turn the master volume up until the power amp starts to overdrive, then back it off just a little. Now when you push the amp into overdrive you’ll have both the pre amp and power amp breaking up. This is what people refer to as natural amp overdrive. If you only use the pre amp on its own for drive sounds, you’re missing out.

Intro to Pedals Part 5: Signal Chain

Effective pedal order is a subject that used to be treated as a great mystery, as though the correct signal path for each guitarist can only be known by them exclusively, and even then only after some kind of mystical revelation.

That’s absolute rubbish of course. People have been experimenting with their signal chains for decades now, common results have been documented, and a rough idea of best practice has been arrived at. In this post we’ll go over what that “best practice” looks like, why it works the way it does, and help you decide if, when, and how to “break the rules” so to speak.

Let’s get into it.

Standard Practice

Pitch

First of all, anything that needs to track the pitch of your guitar should get the cleanest, most unadulterated signal that it can if you want it to have a sporting chance of doing its job properly. By this I’m referring to your tuner, pitch shifters like the Digitech Drop and Whammy, and perhaps even octave pedals.


Gain

After that, it’s a good idea to have your drive section towards the start of the chain. This includes fuzz, overdrive, boost, and distortion.

Drive pedals typically define your EQ and gain level, which form the core, fundamental part of your tone. From that perspective it makes sense to establish this first before letting other pedals do freaky things with your core tone later in the chain.

Putting drive pedals after other pedals can radically change the way they sound. There are definitely situations where that can sound cool, but we’ll cover those later. For now let’s keep things fairly simple and vanilla.


Modulation

Next in the chain would be modulation pedals. This is the wobbly stuff:

  • Vibrato (modulates your pitch up and down rhythmically)
  • Chorus (splits your signal in two and applies vibrato to one of them)
  • Phaser (splits your signal in two and moves them in and out of phase with each other)
  • Flanger (splits your signal in two and adds a subtle delay to one of them, creating a swooshing effect)
  • Tremolo (modulates your volume up and down, creating a shimmery or choppy sound).

Modulation pedals add character and create a sense of movement to the core tone you established in your drive section.


Time

After modulation we deal with time and space via delay and reverb. The idea of these is to take your whole signal and make it sound like it’s echoing back from or reverberating off the walls of a large space. For that reason you might want to send all of your effects into these.


The Fight for Last Place

Given that tremolo works by rhythmically dropping your volume, it’s possible that reverb tails or delay repeats which fall in that otherwise silent space might counteract the feel of it. For this reason, some people like to put tremolo at the end of their chain.

Then again, putting tremolo after delay creates the possibility of that silence coinciding with delay repeats, making it feel as though the delay isn’t turned on at all. The other possibility is your dry signal being silenced by the tremolo and only allowing the repeats through. The most likely scenario would be a mess of both. Best to experiment if you want to use delay and tremolo at the same time.


The Fight for First Place

For all their tough-guy image, some fuzz pedals can be total princesses about their input impedance. This means if they’re not the very first pedal in your chain they can behave like a spoilt brat.

Wah pedals typically go before your drive section to function properly, so if you have temperamental fuzz, you might have some experimenting and prioritising ahead of you. You’re in for a real headache if you have a fussy fuzz, a wah pedal, and a pitch-based effect that you intend on using at the same time.

The big picture looks something like this:
Pitch – Gain – Modulation – Time

I’ve seen some people on guitar forums post the chart below from Roland, stating that it’s all you need to know on the subject of signal chain. As we’ve just seen though, it’s not that simple.

There are a few issues that make it not terribly helpful for new guitarists trying to get their heads around signal chain issues:

  • It makes no attempt to include a fuzz
  • It does not tackle the tremolo dilemma
  • It includes a Metal Zone. Honestly, what kind of message are they trying to send to new guitarists? What’s next? Handing out crack at a kindergarten?


Gain Stacking

Hopefully you’ve now got a decent idea of standard practice for the order of most pedal types. Within your drive section though, you might have a bunch of different types of gain pedals. Let’s have a look at how you might want to order them.

Just in case your fuzz pedal is the sort of entitled infant that will throw a hissy fit if it’s not first in line, we’re going to give it what it wants: Fuzz first.

Of course you love your Fuzz. It’s ok to feel sick of its bullshit from time to time.

From there though, you need to consider what you want your drive pedals to do.

If you want one pedal to provide a volume lift for another, you would place the heavier gain pedal first and the lighter gain pedal second. Order your drives from heaviest to lightest to get a big, high headroom drive sound.

If you want one pedal to add more distortion to another, you would place the lighter gain pedal before the heavier one. Order your drives from lightest to heaviest to end up with a chain of cascading nastiness.


Breaking the Rules

The number one piece of advice handed out to people who ask about pedal order is to “try it out for yourself”. Fortunately for you I’m not a complete asshole, and I acknowledge what a pain it can be to completely re-route your pedal board just to see what will happen. In this next part I’m going to try to explain the most likely outcome should you stray from standard practice.

That’s not to say you shouldn’t experiment. No one’s going to call the cops if you put your reverb first in your chain and your fuzz pedal last. There’s a pretty good chance you won’t enjoy the outcome, but you are of course free to do what you want. Experimenting and listening will no doubt give you a much better perspective than reading about it in a blog post.


Gain after Modulation

Placing drive after another kind of pedal will take its signal and compress it, smoothing it out and making it more consistent. With modulation, that kind of defeats the purpose.

Then again, maybe you have a modulation pedal that’s a little bit drastic for your tastes. Putting a subtle overdrive after it could tame it nicely. This would be a sensible reason to put drive after modulation.

Having said that, putting a killer high-gain metal distortion after modulation probably won’t be as kick-ass as you’re hoping. The distortion would sound more impressive with a clean signal going into it, and would only work to minimise and muddy-up the modulation.


Gain after Delay

Delay repeats typically decay or get quieter as they go on. If you put a drive pedal after it though, the compression will interfere with that decay. Repeats will continue for longer and potentially crash into each other. It’s a big, chaotic noise that might be fun to play with, but not what most folks have in mind when they reach for a delay pedal.

A slap back delay (one repeat with an extremely short delay time) can work either side of a drive without issue.


Gain after Reverb

Similar to the issue with repeat decay in delay pedals, putting a drive pedal after reverb will make the reverb tails carry on longer and create a big, chaotic noise. Again, fun to play with, but practically unusable unless you’re in a shoe-gazer band or avant garde noise act.


Using the Effects Loop

If your amp is already breaking up without the use of drive pedals, then your amp is acting like an overdrive pedal at the end of your chain. If you’ve taken anything from this article so far you’ll know this could be problematic.

While there’s probably a whole article I could write about how amps work, for now let’s just look at the two main parts: the pre amp and the power amp.

The pre amp sets the gain and EQ of your signal before handing it over to the power amp, which makes the whole thing louder. It’s the pre amp which is likely causing your amp to overdrive.

An effects loop lets you plug a few pedals between your pre amp and power amp. If you use your pre amp for your drive sounds, you can still maintain your signal chain by putting your modulation, delay, and reverb pedals in the loop.


What about a Phrase Looper?

There’s often confusion about where to put a loop pedal. These typically go at the end of your chain before your amp so they can catch everything, but again, you don’t have to do what everyone else does. Just remember that it will record anything you put in front of it, and its playback will be affected by anything you put after it.


Where Do I Put My EQ Pedal?

Put your EQ pedal wherever you feel the EQ correction needs to be made. If you’re trying to counteract a tonal quality of a specific pedal (like put some mids back in if you’re using a Muff, or bottom end if you’re using a Tube Screamer) put the EQ immediately after the pedal in question.

EQs can be fun to play with in your drive section. Just turning the level up can make it work like a boost. Cranking a specific frequency before sending your signal into a drive pedal will make that frequency overdrive more.


That’s All For Now

Hopefully that should cover most of the common questions that pop up around all things signal chain.

If I could impart any advice on the subject it would be to have a clear idea in mind about what you want to achieve before you start plugging things in, to save a lot of mucking around. Also, having said that, feel free to experiment and let your ears guide you.

Oh, and if you see this guy lurking around outside your school trying to sell Metal Zones: JUST SAY NO!