By now you’ve probably got a few pedals and have a fair idea of how to power them effectively. Let’s look at how to hook them all up together on a pedal board.
Why Should I Bother?
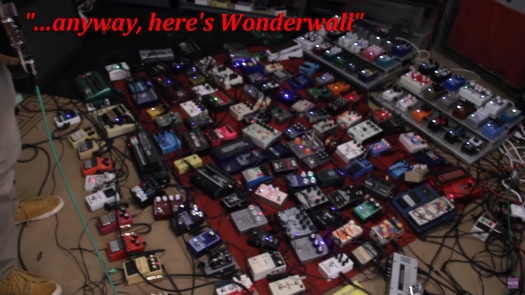
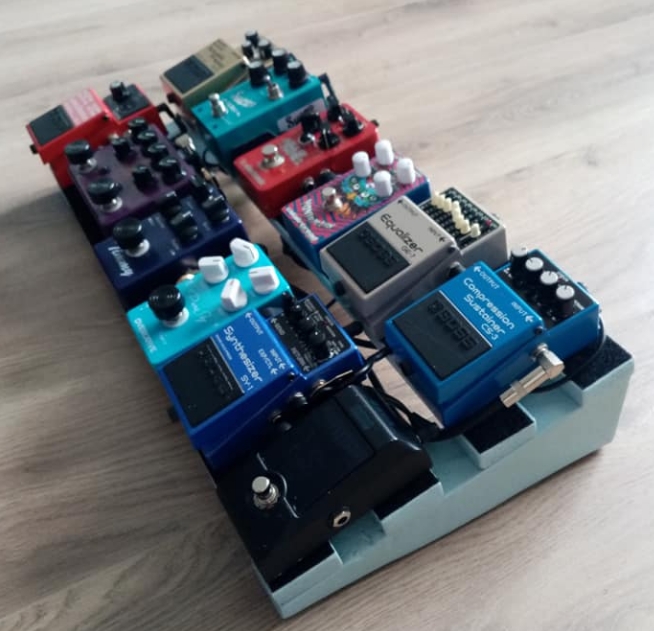
The point of mounting your pedals on a board is to keep them together in a manner that’s accessible for your feet, portable, doesn’t take up too much space on stage and is lightning fast to set up for a gig. There are a few different ways to do this, but the most common method involves a slotted pedal board specifically angled to keep your power supply and cable runs underneath and out of the way.
You can easily invest a lot of time and money getting it all perfect, but you need not do this to be a “pro”. Consider Eric Johnson’s pedal board for a moment. He has one of the most sought after guitar tones in the world and plays like a beast. When he takes his pedals on tour, they’re taped to a panel of particle board any-which-way, with cable runs all over the place. It’s a hot mess akin to Homer Simpson’s failed BBQ pit, and yet no one could possibly argue that it doesn’t do the job.

Clearly a tidy and efficient pedal board isn’t a pre-requisite for being a pro. Perhaps Eric Johnson is just so damn good that he can successfully work with a rig that looks like a pedal-eating monster threw up on the stage. The rest of us rookies need all the help we can get, so let’s look at how we can get things in order.
The Board
Oddly enough most pedal boards more closely resemble welded together frames than boards. The point of this is to enable you to poke your cable runs underneath and keep them out of the way.
You’ll see some that are raised at the back to angle the whole thing towards the player. This provides better access to the pedals at the back of the board if you have more than one row, and also allows you to secure your power supply underneath.
![]()
There are heaps of commercially available pedal boards on the market, catering to a wide range of budgets and rigs. Pedaltrain is one of the more expensive options, but would be considered the industry standard.
Before diving in and buying a pedal board, consider your needs. Lay all your pedals out as they would be on a board, and then measure to see what size board you should get. I’d advise you to go a bit bigger than your current requirements, as two things are almost certain:
- They won’t fit on like you think they will
- You’re going to get more pedals. Don’t bother arguing with me, we both know it’s going to happen.
If you’re on a tight budget, do a quick search on “Hejne pedalboard” or “Gorm pedalboard”. Ikea makes a shelving unit which used to be called Gorm, but has recently changed name to Hejne. The shelves themselves are sold separately at such a low cost they may as well be free, and there is a long standing tradition of DIY guitarists repurposing these for pedal boards.
Safety Tip:
The floor might seem like an obvious place to work on your pedal board, as that’s where it would normally live. Bear in mind though that assembling a pedal board takes time and requires the use of your hands, not your feet. Use a table or a bench while you’re putting it all together. Your knees and back will thank you for it.

Attaching The Pedals
Velcro/Hook & Loop Tape
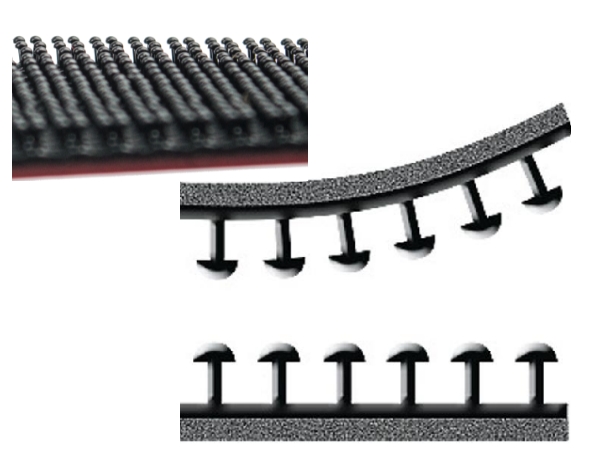
You’ll need to attach your pedals to the board somehow, and the most common way is with Velcro. It’s worth noting that when you choose a roll of Velcro to buy, if you see words like “heavy duty” or “extra strength”, this refers to the strength of the adhesive backing. The bond between hook and loop will be pretty much the same no matter what you buy.
The convention here is to put the loop side (the soft, fuzzy side) on your board and the hook side (with the stiff, spikey bits) on the bottom of your pedals. The world won’t end if you do it the other way around, but there are a few good reasons to do this.
- If you use your pedals off the board, the hook side will provide more traction on carpet
- Most of the pedal-using community do it this way. If you swap or buy second hand pedals and have the hook side on your board, your newly acquired pedals (also with hook side already on them) won’t stick to your board.
- Doing it the same way every time means not having to stop and think about which bit goes on the bottom of the pedal every time you buy a new one.

It’s good practice to cover your whole board in Velcro instead of putting little pedal shaped patches down here and there. This gives you the freedom to move your pedals around on the board wherever you want. Also, if you only use a little bit of loop on the board, when you remove the pedal you’ll likely unstick the loop side with it.
You want as much of your board to be covered in Velcro as possible, so cut your strip a bit longer than you need, then trim it back once it’s on your board. This will prevent you from coming up short.
When you put the loop side on your board, peel back only a little bit of the backing paper, stick the small patch of exposed Velcro down and then slowly peel more back, sticking a little bit down at a time. You’ll have a better chance of keeping it straight and not bunching it up or getting bubbles than if you peel all the backing off to begin with and stick the whole thing down in one hit.
When you put the hook side on your pedals you might notice there’s not much room for Velcro. Don’t worry if you can’t cover the whole base of the pedal, a little bit of hook tape will do.
If your pedal has feet or risers preventing it from sitting flat on your board, you can unscrew them and keep them in a safe place. I’ve discovered that the feet of a Cry Baby wah will fit between the slats of a Hejne shelf, so if you use one of those for a pedal board, you don’t have to unscrew the feet off your wah.

Most Boss pedals (and pedals like them) have symmetrical base plates. This means you can take them off and put them back on inside out. The Velcro then goes on a flat surface and the label gets preserved inside the pedal.
Alternatives
If you want something to hold onto your pedals a bit better than Velcro, there are a few other options. The first thing I’d recommend is psychiatric help. Seriously, Velcro is fine. Your pedals won’t fall off, and you can easily swap them out or reposition them without fuss. If you insist on being inconvenienced every time you move a pedal, here are a few other things to look into:
3M Dual Lock
Dual Lock is a lot like Velcro, except instead of a hook side and a loop side, both sides are identical. It’s a network of interlocking mushroom shaped knobs, which when stuck together are almost impossible to separate. Almost. I’ve heard a regular butter knife and an up-to-date lexicon of curse words can help to separate board from pedal when you use this stuff.
I haven’t tested this myself, but apparently if you get a pedal that already has hook side Velcro on it, this will stick to the dual lock on your board as though there was dual lock on the pedal as well. Yet another reason to put the hook side on your pedal and not on your board.
Cable Ties
While using dual lock might seem a bit over the top, it’s something you’ll find professional international touring musicians doing. One of the more ghetto over-the-top solutions is the use of cable ties.
There’s a real art to getting the cable ties on without them getting in the way of jacks or knobs. If it turns out you’ve put your pedal in the wrong spot, you’ll have to cut the ties off, bin them, and start again with new ones. This approach is as neat as it is fun and practical.
Bike Chain
The side of a bike chain link forms a figure 8. One hole of this figure 8 gets screwed up into the base plate of your pedal. The other sticks out to the side so you can screw it down onto your board.

This method brings with it all the joy of disassembling a bike chain and needing to reach for a screw driver and a drill any time you want to move a pedal. On the plus side, those pedals aren’t going to move or fall off your board any time soon, and it can look fairly neat.
Connecting your pedals
Next you’ll need to connect your pedals up to each other. I’d recommend using patch cables instead of solid couplers.

What’s Wrong With Solid Couplers?
For starters, most pedals have their jack sockets in different positions. Those which do actually line up will also tend to have their sides slope in on an angle (the top of pedal is slightly smaller than the base of the pedal). This means that a jack plug is going to extend out of the socket at not-quite-90-degrees. Pedals joined with solid couplers won’t be able to sit flat next to each other. If you make them do so by adhering them to a pedal board, you’ll be applying upwards force on both jack sockets which could lead to them being damaged. A whole lot more force is added every time you step on a pedal to use it.

Connect enough pedals together with solid couplers and they’ll form a circle
Replacing a damaged socket might not be that big of a deal, but if those sockets are mounted directly onto the circuit board, that could get damaged as well. In that case, good-bye pedal.
Even if the sockets line up exactly (they won’t) and you mounted your pedal super securely to the pedal board, stepping on it will still introduce a small amount of movement. It might take longer for damage to happen, but it will happen.
Then there’s these bastards:

These offset or “Z” couplers might seem like a decent work-around. The trouble is that when you apply that downward force, they tend to want to rotate, which is even worse for your pedals.
Using a patch cable instead means the connection between pedals remains flexible, and any movement is isolated to the pedal you’re stepping on.
Some people will tell you they’ve used solid couplers for years and never had a problem. That’s fantastic news for them, but it doesn’t negate everything I’ve said so far. Imagine if your neighbour said they haven’t locked their front door in years and yet they’ve never been robbed. That doesn’t mean it can’t or won’t happen, that it hasn’t happened to other people, or that you should follow their naïve example.
Soldered vs Solderless Patch Cables
You’ll find much debate online about whether you should go for soldered or solderless patch cables. The argument in favour of soldered cables is that a soldered connection is about as secure as it gets, and any solderless solution is going to be a compromise. The argument in favour of solderless cables is that if you’re inexperienced with a soldering iron, your joins are likely to be bad, and a good solderless connection is better than a bad soldered one.
Both points are equally valid, and the decision to buy one over the other comes down to how well you can solder. That’s for you to figure out.
Whichever one you go with, cut your cable a bit longer than you need to make sure there’s enough length to bend around the slats of your board and actually make a connection without being pulled tight. A little bit of slack is good. Besides, you can cut down a cable that’s too long, but if it’s too short it’s useless.

Personally I buy pre-manufactured patch cables. The length might not be 100% what I’m after for every pedal placement, but I can get close enough without having to assemble cables myself. If you take this path, once again just make sure you’ve got enough length.
A quick word on braided cables: These things are great for long cables like the one that you plug into your guitar, or from your pedal board to your amp. They prevent kinks and tangles, and keep your cable relatively straight. With short patch cables though, you want as much flexibility as possible. Getting around the slats on your board and connecting to your pedals requires sharp turns that can’t be made with stiff cables. I’m not sure why short, braided patch cables exist, but they’re not much good for pedal boards.
Cable Direction
Its good practice to have your power cables running 90 degrees to your audio cables, or keep them separated as much as you can. There’s a possibility you’ll encounter noise and interference if you bundle them all up together in the same direction.
Do I Need a Loop Switcher?
The longer the path between your guitar and amp, the more top end you’re likely to lose from your tone. If you have a lot of pedals on your board, even when they’re turned off, the signal path to your amp is considerably longer than if you plugged straight into the amp.
You can get around this by using buffers. Most Boss pedals have buffered bypass, so chances are you already have some buffering in your signal path and don’t need to worry about this.
The other work around is to use a true bypass loop switcher. This will get every pedal completely out of your signal path until you select them on the switcher. If you have more than five or six pedals in your chain, and your signal seems to have lost a noticeable amount of top end, a loop switcher might be worth trying.
The other thing switchers are good for is enabling access. You could have all your pedals routed through the switcher, and then access them from a single neat row of buttons at the front of your board. This greatly cuts down on having to step over a row of pedals to get at the one you want.
Another access benefit of switchers is cutting down on “tap-dancing”. Say you want to change from one sound to another mid song, but doing so requires turning three pedals on at the same time. If those three pedals are in the same loop of your switcher, you need only step on one button to activate all three pedals.
There’s not a lot to consider when buying a loop switcher. Cheaper ones will have cheaper parts, so in theory the switches you step on every time you play could wear sooner than higher quality ones.
A simple switcher could in theory be entirely passive. It’s a mechanical device that re-routes your signal without the need for electricity. You will of course need some small amount of power if you want an indicator LED for each switch. More complicated switchers have digital controls which enable you to program different combinations of pedals to each switch.
One thing few people consider when buying a switcher is how far apart the sockets are on each loop. If your jack plugs are wide, they might not fit side-by-side in a looper with closely positioned sockets. You could fix that by getting patch cables with narrower jack plugs, but it’s something to think about.
That’s all for now
We’ve covered choosing a board, securing your pedals to that board, dealing with patch cables, and looked at whether or not you might benefit from a loop switcher. Next time we’ll look at your signal chain. Deciding what order to hook your pedals up in is a big deal which will have a huge impact on the sound that comes out.